
Beach Detecting After a Storm: Reading Sand Movement
Storms strip sand and expose years of lost jewellery. Here is how to read cuts, scallops and black sand, when to go, and how to work a scoured beach safely.
Most beach detectorists work the beach in front of them. The good ones work the beach the sea has just rearranged.
Sand is not a fixed thing. It moves seasonally, it moves with every tide, and occasionally it moves catastrophically. A storm can strip a metre of sand off a beach in a night and expose ground that has been buried since before you owned a detector. Everything heavy that has been quietly sinking through that sand for years is suddenly within reach.
Knowing how to read that — and when to turn up — is the single biggest difference between beach hunters who find gold and beach hunters who find bottle caps. Our beach detecting guide covers the fundamentals of salt, tides and machine settings; this article is about the conditions that make a beach worth the trip.
Why storms give and calm weather takes
The mechanism is simple once you see it.
In settled weather, gentle waves push sand up the beach. The profile builds, the berm grows, and everything lost on that beach gets buried a little deeper. This is the state most beaches are in most of the time, and it is why a beach that produced brilliantly last year can feel dead now.
Storm waves do the opposite. High-energy water pulls sand off the beach and deposits it offshore in bars. The beach face steepens, layers are peeled back, and the heavy material that had settled through the sand column over years is exposed or brought close to the surface.
Then, over the following weeks, the sand comes back. This is the crucial part: the window is temporary. A cut that appears after a big blow can be comfortably reburied within a handful of tides. Beach detecting is one of the few branches of the hobby where turning up two weeks late means missing it entirely.
Reading a scoured beach
When you arrive, spend the first ten minutes looking rather than swinging. The beach will tell you where to work.
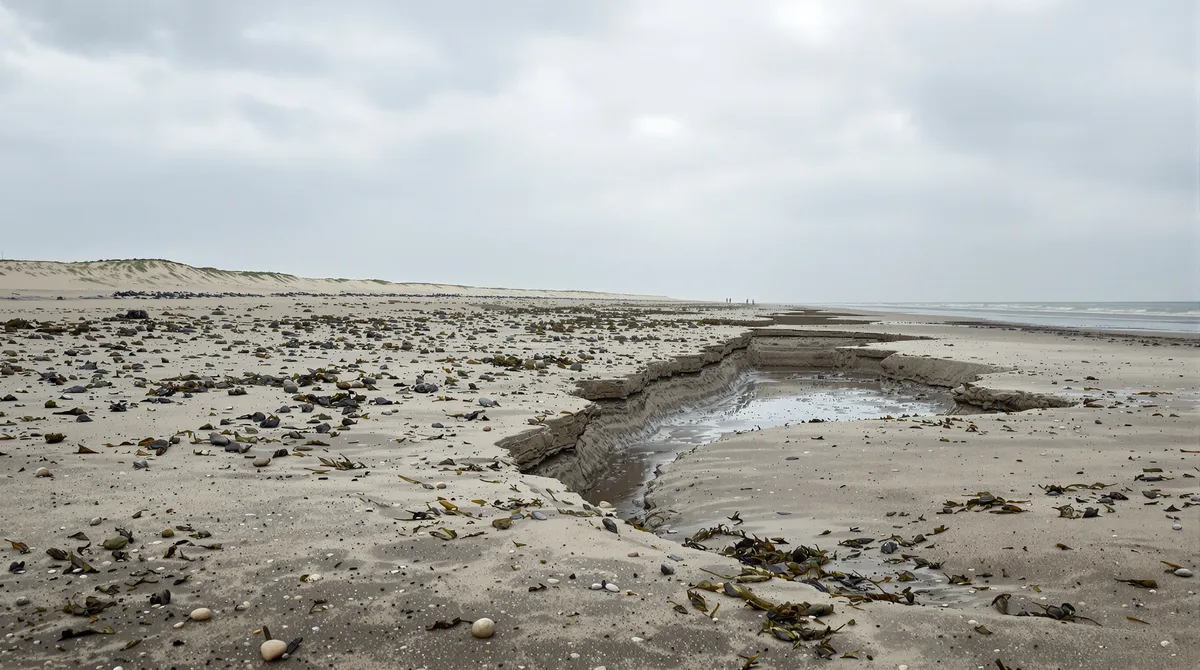
Cuts. A cut is a step carved into the sand by wave action — sometimes waist-high, more often ankle-high and easy to walk past. It marks where the sea removed material. The base of a cut is prime ground, because heavy items that were sitting in the removed layer have been dropped at the boundary. Work along the foot of a cut, parallel to it, and work it thoroughly before moving on.
Scallops and troughs. Curved bays scoured into the beach face show where water swirled and sorted. Heavy material concentrates in the low points.
Exposed hard bottom. Clay, peat, cobble, or compacted older beach showing through the sand is the strongest signal available. Heavy objects sink until they meet something they cannot sink through, and then they sit there. If you can find the layer, you have found where decades of lost rings have accumulated.
Black sand and shell beds. Dark streaks of heavy mineral, or concentrated bands of shell and gravel, both mean the same thing: water has been sorting this spot by density. That is precisely the process that gathers rings, coins and lead. Black sand makes your detector’s life harder and your odds better at the same time.
Cobble and stone lines. Same logic. Where the sea has left the heavy stones, it has left the heavy metal.
The general principle underneath all of it: find where the water sorts material by weight, and you have found where the jewellery is. Everything above is a different way of spotting that.
Timing the trip
Watch the weather, not the calendar. The trigger to go is a sustained onshore blow with big surf — ideally combined with a spring tide, which extends the range of the disturbance both up and down the beach.
Go on the first safe low tide afterwards. Low tide exposes the most beach and reaches ground that is normally underwater. A spring low after a storm is close to ideal conditions.
Do not go while it is still running. This is worth being blunt about. Storm surf, rip currents and unstable cut faces have killed people, and no ring is worth it. Wait for conditions to ease, then go early.
Expect competition. Anyone else on that beach with a detector knows exactly what you know. Being there on the first low tide rather than the third is most of the advantage.
Tide tables and a weather forecast are the only planning tools this really needs, and both are free. Building the habit of checking them is what our hunt planner guide is about — beaches simply make the payoff more obvious than inland sites do.
Working the ground you have found
Grid the productive zone properly. Once you find a cut or a hard bottom producing, slow right down and cover it systematically. The temptation to keep walking and prospect more beach is strong and usually wrong: a productive patch on a stripped beach can hold a remarkable density of targets, and wandering off after two finds is how people leave the third and fourth behind.
Work parallel to the water. Along the cut, along the trough, along the tideline. The concentration is linear, so your search pattern should be too.
Do not neglect the wet sand and the water’s edge. Heavier items work down the beach over time, and the lowest ground exposed at spring low is often the oldest.
Dig the low tones. Gold rings read low and unglamorous, in the same range as pull tabs and foil. On a beach there is no way to separate them by number, so a hunter who skips low tones is a hunter who will not find gold — the asymmetry covered in the keeper-rate guide.
Re-balance for the conditions. Freshly exposed layers, black sand and wet salt behave differently from the dry beach you last balanced on. If your machine feels noisy, the ground changed — not the machine.
Safety on a post-storm beach
A stripped beach is a genuinely different environment from the one you know, and the hazards are not obvious.
Cut faces collapse. An undercut sand face looks stable and is not. Do not work directly beneath a high cut, and do not climb them.
The beach profile has changed. Steeper faces and newly formed rips mean the water behaves differently from how it did last month. Water that looks the same is not.
Debris. Storms deposit timber, metal, rope and occasionally worse. Gloves are sensible. Anything that looks like ordnance should be left entirely alone and reported — this is not a hypothetical on some coastlines.
Unstable ground. Newly exposed peat, clay and soft patches can be considerably deeper than they appear.
Go with someone, or tell someone. Early morning, empty beach, poor phone signal, cold water. The combination is worse than any of its parts.
Log the conditions, not just the finds
Beaches reward records more than almost any other detecting environment, because the productive pattern is about conditions rather than place.
Record the wind direction and strength, the tide state, whether there was a cut and where it ran, and what the sand was doing — alongside what you actually found. Do that across a season and something genuinely useful emerges: you learn that this beach cuts on a north-easterly and that one does not, that the south end scours while the north end builds, and that the productive window opens about a day and a half after the wind drops.
That is knowledge nobody can give you, because it is specific to your coastline. It is also completely invisible without a written record — a good day and a bad day feel identical in memory three months later. Tie each session to the spot with a GPS pin, keep it in your logbook, and let the patterns accumulate.
After a couple of winters you stop guessing about which storms are worth getting up for. That is the whole game.
Frequently asked questions
Why is beach detecting better after a storm?
Storms remove sand rather than adding it. A beach builds up gently over months and can be stripped in a single night, exposing older layers where heavy items like rings and coins have gradually settled. That exposed material is why experienced beach hunters watch the weather far more closely than the calendar.
What is a cut on a beach and why does it matter?
A cut is a step or small cliff carved into the sand by wave action, sometimes only ankle-high. It marks where the sea removed a layer of beach, which means older, heavier material sits at or just below its base. Working along the foot of a cut is one of the most productive things you can do on a beach.
How soon after a storm should I go detecting?
As soon as it is genuinely safe, and ideally on the first low tide after conditions ease. Sand returns quickly — a cut can be reburied within a few tides — so the window is often short. Never go while heavy surf is still running.
Does black sand mean gold or jewellery?
Not directly. Black sand is heavy mineral, usually magnetite, and its presence tells you the water has been sorting material by density in that spot. That is the same process that concentrates rings and coins, so black sand is a useful indicator of where heavy things collect — even though it also makes ground conditions harder for your detector.
Keep reading
Beach Metal Detecting: Tides, Salt, and Settings
Beaches hide gold but punish the unprepared. How to read tides and sand zones, stop salt from wrecking your signals, and protect your gear from corrosion.
Metal Detecting the Australian Goldfields: A Field Guide
Where Australia's gold country is, why nugget hunting needs different gear and technique, how to read old diggings, and the safety that actually matters out there.
Planning a Better Metal Detecting Hunt
Weather, soil, tides, access, and safety — plan your hunt before you leave home to waste fewer trips and dig more. A practical pre-hunt checklist.